8 Easy Ways to Supercharge Your Knitting
8 Easy Ways to Supercharge Your Knitting
Want to take your knitting to the next level? Check out these 8 easy ways to make your knitting more efficient. Follow the tips and you'll be more likely to end up with a completed project you're really happy with.
1. Use "the Right" Yarn
With all the thousands of yarns available on the market, sometimes it's difficult to know which one is the right one for your project. There's also so many different types of fibers and small hand dyers, it's almost impossible to match the exactly the same yarn that was used in a pattern. So here's how to choose the right yarn in 3 easy steps:
Make sure you've chosen the correct yarn weight (i.e. lace, fingering, sport, dk, worsted, chunky, or bulky) for your project. On the back of the skein you'll see a little chart that shows the "recommended gauge" or number of stitches over 4 inches.
Choose a fiber that is similar to the yarn used in the original pattern. For example, if the original project was knitted in mohair, look for a mohair or mohair blend yarn or even a lofty spun alpaca to give you similar results.
Think about how the yarn is going to drape. If the original pattern was knit loosely using a thin linen, try and find a linen, linen blend, cotton, or raw silk for similar drape.
2. Choose the Right Garment Size
Have you ever spend HOURS knitting a sweater only to find out that it doesn't fit at all the way you had hoped. Be sure when you are choosing pattern size you pay attention to both the completed bust measurements and the ease. If it's a fitted sweater, bust measurements will be smaller than your actual bust measurements. If it's a roomier or more relaxed fitting sweater it will have a positive ease and be larger than your actual bust measurements.
It's also helpful to know the measurements of some of your favorite sweaters in your closet to help you gauge how a project you choose will fit you. So, take a few sweaters out of your closet and lay them flat. Then measure across just under the sleeves. Double that number (for front and back) and you'll have a pretty good idea of the size sweaters you like when choosing your next knitting project.
3. Check Your Gauge
Ok, first let's admit something. We have ALL ignored gauge at some point during our knitting journey or said to ourselves, "oh, I knit to gauge" and ended up with a project being much larger or smaller than we had hoped. When knitting a project (especially a garment), take the time to actually knit the gauge swatch and make sure it's correct to insure the proper size.
How to Measure Gauge
Place your swatch on a flat surface with the right side facing up.
Using a ruler or tape measure, measure a 4 inch section (horizontally) and put a pin at the beginning and end of that section.
Count the number of stitches between the beginning pin and the end pin. In our example above there are 19 stitches in the marked section so our gauge is 19 stitches for 4 inches. To find our how may stitches for an inch merely divide the stitch count by 4. For our example above our stitch per inch gauge = 4.75
Tip for Success: Make sure you count the half of a stitch as well as whole stitches. If your end pin cuts through a stitch or is sitting in the middle of a stitch (as it does in the image above) make sure you count that 1/2 stitch. It makes a difference. A 1/2 stitch does not sound like much, but take that 1/2 stitch over the total width of a garment and it can add up several unwanted inches making your project too big or too small.
You've measured the swatch - Now What?
Too many stitches per inch? Go up a needle size
Not enough stitches per inch? Go down a needle size
4. Use a Lifeline
A lifeline is a way of protecting previous rows of knitting. If you make a mistake or drop a stitch, you'll only need to rip back to the lifeline instead of completely having to restart a project. If you are working on a stitch pattern and you place a lifeline after the same row in a repeat, it will make it easier to know where you are in your knitting. How to add a Lifeline.
5. Write it Down
Does it make you a better knitter if you keep knitting instructions in your head? Does it make you a better knitter if you keep what row you're on in your head? Does it make you a better knitter if you change needles and think you'll remember what size needle you were using? I'm here to tell you, NO! I've made all of these mistakes (and countless others) until I finally realized the importance of WRITING IT DOWN.
Keep a notepad next to your pattern, put a post-it on the pattern, or use Notes to Knit By. While deep in your knitting project you think you'll never forget what stitch you were knitting, row you were on, or needle size used...but you will! I've abandoned projects for weeks (and even a year+) because I forgot a very simple yet important piece of information. So, if you decide to start another project and "borrow" the needles from the current project, write down the needle size/length, etc. If you are working on a pattern with a stitch repeat and get up to make dinner, make note of what row you stopped on. If you're working sleeve decreases, write down where you stopped for the evening. This is really one of the best LESSONS I'VE LEARNED in knitting.
6. Learn to Read Charts
Knitting charts are a great way to supercharge your knitting and make working stitch patterns fast and fun.
Why Use a Knitting Chart?
Once you learn how to read a knitting chart, you can knit anywhere with ease. You'll be able to print the chart, pop it into your purse and turn a more complex project into a very portable/travel project.
Knitting Charts Fact or Fiction
I think there are several misconceptions about knitting charts.
Fiction: Knitting charts are only for experienced knitters.
Fact: Beginner and Advanced Beginner knitters can enjoy knitting from charts. You just need to learn the basics.
Fiction: Charts have all that “stuff” on them, it must be complicated.
Fact: There are lace patterns that are way more complicated period, and their charts reflect that. However, there are many patterns with very simple charts. Once you know how, these charts are very easy to read.
Fiction: Looking at all those symbols is scary and intimidating.
Fact: Just like learning to read a map, you need to find out what the symbols mean. The rest is easy and I'm going to walk thru all that step-by-step.
Fact: I can’t tell you the number of patterns I loved and passed up because of charts. Finally, I tried a chart and now I’m hooked. Now, it's your turn!
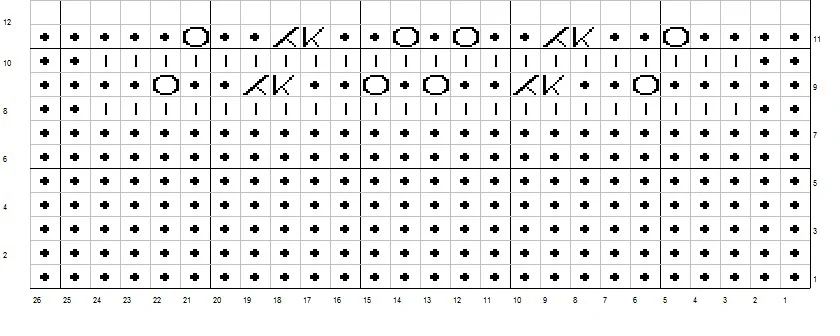
How to Read a Knitting Chart
Numbers across the bottom. They indicate number of stitches across the row
Numbers running up the right side. They’re a little small but they are all odd numbers, right? They indicate your right side (RS) rows and are odd numbers just the same as in your knitting
Numbers running up the left side. The opposite applies for the numbers running up the left side. Those even number rows indicate your wrong side (WS) rows.
Working the Knitting Chart
Now to work the chart you would start with Row 1 and do the stitch in each one of the boxes and work across the boxes from RIGHT TO LEFT until you get to the other side.
Now you need to return and you would do that by working the 1st box in the row marked Row 2 (look on the left side of the chart). What that means is that wrong side (WS) rows are worked LEFT to RIGHT.
Now, wasn’t that easy? But how do I know what stitches to use? Let's take a look at the Chart Symbols below.
Read a Knitting Chart
Chart Symbols or Key
Just like a map, every chart you see will have a corresponding “Symbol or Key” listed on the pattern to tell you what stitch each symbol represents. You’ll see this each and every time.
4. Count Stitches in the Row
There's nothing worse than getting midway through a project and discovering you added or dropped stitches several inches back. Having to rip back and pick up stitches is not fun. The easy way to avoid this problem is to get in the habit of counting the stitches at the end of the row.
8. Don't Skip Blocking Your Project
Blocking: Why Block a Knitted Project?
First and foremost, blocking matters. In my mind, not blocking is the same as not frosting the birthday cake (and who lets you get away with that?). Sure, you've made some effort but haven't gone all in. So, let's go all in and block! You won't be sorry.
Benefits of Blocking - It allows you to:
Set the final shape of the garment
Adjust the dimensions (longer, wider or both)
Even out the majority of imperfections
Give the fiber the opportunity to bloom and stitches to plump
Open up lace motifs
Types of Blocking
Wet Blocking - full water immersion, shape, lay flat to dry
Modified Wet Blocking - spritzing until very damp, shape, lay flat to dry
Steam - light blocking on either a hanger or dress form
So there you have it - 8 Easy Ways to Supercharge Your Knitting. How many of these have you adopted in your knitting arsenal? What has worked for you and what hasn't? Let us know in the comments below!


