How to Hand Dye Yarn with Kool-Aid: Step by Step Tutorial
How to Dye Yarn with kool-Aid: easy Step by Step Tutorial
How to Hand Dye Yarn with Kool-Aid!
Today my daughter and I dyed yarn with Kool-Aid. It was a really enjoyable experience. Since I've never hand dyed yarn before, I was a bit anxious with the whole experience. Concerns I had were: Is it going to be messy? Do I have the right material? Will all the colors mix together and make the yarn look like mud? Did I buy enough Kool-Aid to do this correctly? Will I screw this up and ruin some very nice yarn?
Today my daughter and I dyed yarn with Kool-Aid. It was a really enjoyable experience. Since I've never hand dyed yarn before, I was a bit anxious with the whole experience. Concerns I had were: Is it going to be messy? Do I have the right material? Will all the colors mix together and make the yarn look like mud? Did I buy enough Kool-Aid to do this correctly? Will I screw this up and ruin some very nice yarn?
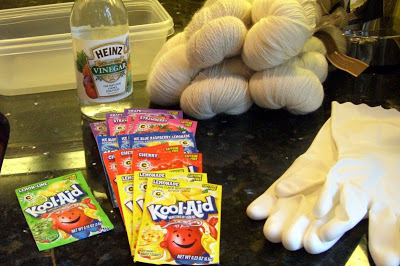
Gather Materials for Dyeing
Well, now it's time to find out!
Acutally, dyeing yarn was a lot like dyeing Easter eggs, but easier and not as messy! My daughter and I had a lot of fun.
Here is a step by step tutorial of the process.
Step 1 Gather Materials
I purchased four Ziploc large rectangle containers, distilled vinegar, 3 packets each of my favorite unsweeted Kool-Aid colors, 2 pairs of latex gloves, and Plymouth Dye for Me yarns. Overall, my list was pretty good. I used only two of the Ziploc containers (one for dyeing, one for rinsing), but ended up scrounging around the house for small containers and squirt bottles for different types of application.
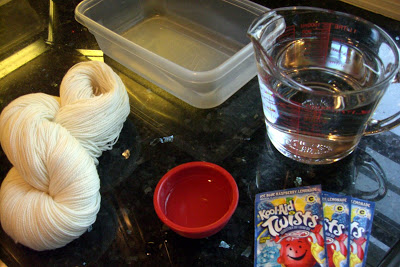
Mixing and Preparing the Yarn before Dyeing
Step 2 Mixing the Dye and Preparing the Yarn
Mixing the dye was really easy! In the plastic pan I poured: 1 quart water (32 oz), 1/4 cup vinegar, and 2 or 3 packets of Kool-Aid. The more Kool-Aid you add, the more intense the shade of dye.
Step 3 Dyeing Main Color and Heat Setting
While my daughter mixed the dye, I prepped the undyed yarn by soaking it in water and the gently squeezing out the excess. We placed the yarn in the pan with the dye, then put the pan in the microwave for 5 minutes on high. Side note: Kool-Aid dyeing makes the yarn smell good enough to eat!

Dyeing Main Color and Heat Setting
When we removed the pan from the microwave, we placed the yarn in another pan filled with clean, cool water to rinse. Then we gently squeezed excess water from yarn.
Step 4 Adding Spot Colors
We could have stopped with step 3 and used only the single shade of dye. But we decided to adventure on a bit more and add some spot colors. We filled a small squirt bottle with a more intensified version of our Kool-Aid concoction: 1 packet of Kool-Aid, a tablespoon of vinegar, and filled remainder of the bottle approx. 1/2 way with water.

Adding the Spot Colors
This was my daughter's favorite part! I held up the opened hank and she squirted and sprayed, applying the dye in just the right places.
When the second round of color was applied to her liking, we placed the yarn back into an empty pan and microwaved it for another 3 minutes on high.
Step 5 The Last Rinse
Remove the pan from the microwave. Rinse yarn one last time in cool, clean water. Gently squeeze excess water from yarn.
Step 6 Drying
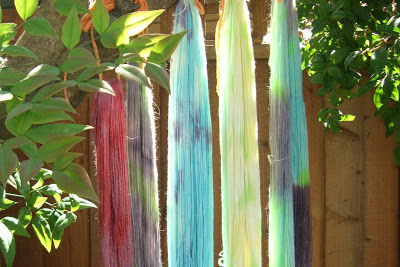
Finished Hanks Drying Outside
Ta-Da! Hang the yarn out to dry. We hung our yarn on a tree in the backyard. It's almost dry! Now to think of knitting projects for each yarn....
I republished this post due to the interest in kool-aid yarn dyeing. I wrote the original post several years ago, so here is a new list of resources for purchasing undyed yarns.


